"What are A, B, Cs for?" my little one asked.
They make up words. You put them together to make words.
So naturally, after they have mastered their alphabets, it's time to introduce words.
I would like to share with you two activities that help to introduce words.
Here, we emphasised more on the first letter of the words.
WEEK 11: Words
TOPIC: The first letter of the word
ACTIVITY 1
Recognising the first letter of the word
Materials:
2. Teach the child/student to file the papers according to the correct alphabetical order. With "A" at the top and "Z" at the bottom so he/she would have to do it in the reverse order.
They make up words. You put them together to make words.
So naturally, after they have mastered their alphabets, it's time to introduce words.
I would like to share with you two activities that help to introduce words.
Here, we emphasised more on the first letter of the words.
WEEK 11: Words
TOPIC: The first letter of the word
ACTIVITY 1
Recognising the first letter of the word
Materials:
- Word cards: You can use readily available flashcards or make your own words flashcards to cover the entire set of alphabet.
- You'll need alphabets. Either plastic or wooden or just print them out and cut them out individually. Here, I used wooded alphabets from the art and craft supplies shop.
NOTE: First, demonstrate how the activity is should be done by giving a few examples to the child/student.
Arrange the flashcards at a corner of the "activity area". Then in a box, put all the alphabets that you want use in the activity.
- Take an alphabet. In this case, I took "c" and place it in the centre of the "activity area".
- Say out loud: "C".
- Then, look for words that begin with the letter "C" from the flashcards. As you pick a card, said: "C" for car, ""C" for cat, "C" for clock, etc. Point at the first letter of each word as you say.
- Repeat one or two more times using different alphabets.
The child/student will then get the idea. Next help him/her to do one or two groups of words then get them to try on their own.
ACTIVITY 2
Sequence of the alphabet and the first letter of each word
Materials:
- Print out the entire set of alphabet, each on one A4 size paper. (Refer to Picture A below)
- Print out a picture each for each letter. For example "A" for alligator and "B" for basket. So you have to print out a picture of an alligator and a picture of a basket.
- Stick the picture next to the alphabet. In my case, the picture already comes with the alphabet.
- Print out the words based on your pictures. Cut out each word individually. (refer to Picture B below).
Give the printed alphabets (with the picture already on it) to the child/student and ask him/her to arrange them accordingly on the floor. (refer to picture A)
 |
| Picture A |
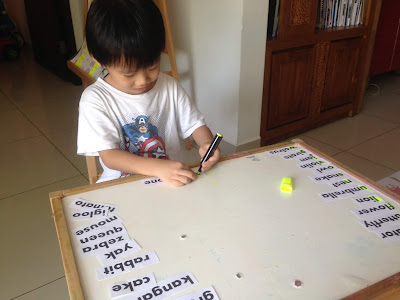
Give the words to the child/student and get him/her to highlight the first letter of each word.
You can use a highlighter, a marker pen, crayon or colour pencil to do it.
You can use a highlighter, a marker pen, crayon or colour pencil to do it.
 |
| Picture B |
Next, the child/student will have to match the words to the correct first letter. Here, it is "G" for grasshopper. (Refer to Picture C)
Extra activity for ACTIVITY 2
You can get the child/student to file the papers accordingly.
You'll need a paper punch and a folder.
1. Teach the child how to punch the holes. (Refer to Picture D)
 |
| Picture C |
2. Teach the child/student to file the papers according to the correct alphabetical order. With "A" at the top and "Z" at the bottom so he/she would have to do it in the reverse order.
Have some alphabet fun this week! 😀


Comments
Post a Comment